Search This Blog

Sunday, August 8, 2010

Glass etching

Supplies needed: Clear Contact paper
Cricut machine or die cut machine
Glass item- pan, vase, bowl, etc.
Glass etching medium
Foam brush
Rubber gloves

Clean your glass item with glass cleaner.Cut out your word(s) or design. If you're doing it on the bottom of a pan cut the words out backwards (by placing your contact paper opposite when you cut it).
Place contact paper on your glass item. Make sure you rub out all the bubbles and get all the edges placed securely down.
Place your glass etching medium on the glass using the foam brush. Follow package directions for time. (You can sometimes scrape off the extra cream back into the bottle.)
Remove the cream thoroughly with water before you remove the contact paper.

Wednesday, July 21, 2010

Fabric Headbands


Here is the first project that I mentioned earlier.
Supplies needed:
Scissors
3 coordinating fabrics. Choose one for the flower, one for the flower base, and one for the
headband.
Find two cups (circle cookie cutters also work) of different sizes, one about 1/2" smaller than the other. They should be approximately 2"-3" in diameter. Paper- Trace the circles onto paper and cut out.
Cut one of the larger circles from the fabric for the flower base. Then cut out 4 from the fabric for the flower. Cut the headband from the width of the fabric. I taper them on the ends. Button Needle and coordinating thread After cutting your fabric fold the smaller circles in half and then in half again. Place them in the center of the larger flower and stitch them on. I found that it was easier for me to stitch in a circular motion, close to the center. After you're done stitch your coordinating button in the center.Get your headband. You have a couple of options that I've used. The first one is to iron interfacing to the underside. The second is to layer it with a second piece of material with the wrong sides facing each other. That way when you tie your headband it has bright colors showing. It's just a matter of personal preference. The stitch around the headband, leaving about 1/4" raw seam on the entire thing. This prevents excessive fraying. (If you prefer a more tailored look you can sew under and then sew the pieces together.)After you've completed get your headband get the flower and stitch it on. I put it off-center. You're done and ready to wear it.I ran out of buttons for these last two, but it shows how I sewed the flowers on a bit better.

More Fabric Headbands

The brown headbands
The dark headbands
The pink headbands
The blue and purple headbands
The flowers before I sewed the buttons on and sewed to the headbands.

Monday, July 19, 2010

Coming soon...

I've been busy working on several new craft projects to put on the blog. I should have the pictures uploaded and edited soon, and then I'll start posting them along with instructions.
Here is a list of a few of the projects that I'll be featuring in the coming weeks...
  • Fabric headbands with coordinating fabric flowers
  • Glass etching
  • Message board
  • Necklaces
  • Making a slip into a part of your dress (Perfect for people like me who are on the tall side, tired of searching in vain trying to find dresses and/or skirts that are long enough.)
If there is a craft project that you would like to see featured on the blog please comment and let me know what you want to see.

Tuesday, June 29, 2010

Burnt Satin Flowers

You need scissors, a hot glue gun, satin or satin-type material, a lit candle, hair clip and embellishments (like buttons or jewels).

Cut varying sizes of circles from your material. The great thing about this is that the petals don't have to be a perfect circle. They won't end up that way once you burn them so don't worry about it! Hold the edges in the flame until they start to melt. Don't hold it too long or it will catch fire! When you have the number of petals you want start gluing them together in the center. Add your embellishments to the center. Glue to the hair clip.

For variation use more than one color. You can also add tulle to the flower.

Sunday, June 27, 2010

German Chocolate Cake

I got to make dessert for my dad's birthday. Because it's summer I had planned to make a nice, summery lemon poppy seed cake. But... at 1:00 a.m. if you don't have all of the ingredients you either make do with what you have (not possible this time) or you change your plans.
Growing up, I remember going to my dad's parents' house for a birthday dinner. The cake that my grandma served was the BEST CAKE EVER! My grandma can cook better than almost anyone else I know... no joke. I was in LOVE with that cake, and my mom made it for my birthday every year for several years after. Fast forward several years, and several store bought cakes or "homemade from a box and can of frosting" later I had lost my taste for it. Then I got a Hershey's cookbook for my birthday one year. I turned to the German Chocolate Cake recipe, and was ecstatic. I made it for a family birthday party, and everyone loved it. My mother-in-law's husband, whose family is German, raved over it, so I felt it passed the test. You can find the recipe on the Hershey's website under recipes. Search for German Chocolate Cake. (Sorry, it won't let me link it.)

Delicious Blueberry Muffins

It's berry season again! My family loves this time of year because it means that I'm making blueberry muffins from scratch again. They enjoy the ones from a box, but when do you ever see blueberries that small? It's just not right! These made-from-scratch muffins are better than the ones I've had in nearly every bakery and Starbucks. The recipe comes from an out-of-print book called All the Best Muffins and Quick Breads by Joie Warner. You can find used copies on these websites: Barnes and Noble and Amazon. All my favorite quick bread and muffin recipes are in this book, so I highly recommend it. In case you can't get the book here's the recipe. The recipe says it only makes 12, but I can usually get 18 with the larger blueberries. I also use the cupcake wrappers because it's easier to clean and serve that way.

Blueberry Streusel Muffins
2 c. all-purpose flour
1 T. baking powder
1/2 t. salt
1/2 t. ground cinnamon (I use Saigon cinnamon- buy it at Costco)
2 c. fresh blueberries
1/2 c. real butter
1 c. sugar
2 large eggs
1 c. milk
grated zest of 1 medium lemon
1/4 c. sugar mixed with finely grated zest of 1 medium lemon

Adjust oven rack to top third position; preheat oven to 400 degrees F. Coat muffin pan with vegetable spray, including top edges: muffins rise above pan.
Thoroughly mix flour, baking powder, salt and cinnamon in medium bowl; stir in blueberries.
Cream butter and sugar in large bowl of electric mixer for 3 minutes or until light and fluffy. Add eggs one at a time, then milk and lemon zest. On low speed, blend in dry ingredients just until combined; do not overmix.
Spoon batter into prepared muffin cups, dividing it evenly. Sprinkle lemon-sugar mixture evenly over muffin tops. 
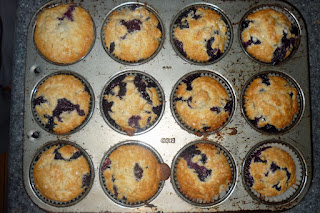
Bake for 25 minutes or until tester comes out clean. Turn out onto rack and serve warm. Makes 12 muffins. (I apologize for not having a picture of the muffins artfully displayed on a pretty serving tray. I have sons... which means as soon as the food is out of the pan it starts disappearing.)
TIP: I get the large crystallized sugar from the cake decorating section and mix it with the lemon zest. It shows up more and tastes better with a little crunch.