Search This Blog

Wednesday, May 27, 2009

Yummy Bread Machine Cinnamon Rolls

I love cinnamon rolls, and while I can bake just about anything, bread eludes me. I have recently found that I can actually make breads if I use my bread machine, and I decided to try to stretch myself and use the Dough function and see if I could make something that way. I found a recipe with good reviews and got started.
Here's my favorite tip I learned years ago when making rolls of any kind. Get a long string of unflavored floss and wiggle it under your dough then slice it. It makes perfect cuts without squishing your dough down. The above picture is how it looks during the cut.
This is how it looks immediately after you cut it. Quick and easy!
There were 2 different variations that I wanted to try. After polling my family my husband and I were the only ones who wanted nuts or raisins in our rolls. I didn't want to try to figure out which was which after so I just did these 2 variations. The pan on the right has cinnamon and regular white sugar. The pan on the left has cinnamon and brown sugar. The white sugar rolls tasted like typical cinnamon rolls while the ones with the brown sugar were moister and gooey-er.
This is the pans after I baked and frosted them. My kids prefer the pan on the left (white sugar) while my hubby and I prefer the brown sugar cinnamon rolls. Yummy! Those got bigger when they were rising for some reason. (As I stated before I'm not a bread baker so I don't know if there's a reason for this.)
Here's my plate. I had to try both kinds so I put them both on my plate.
The next time I make them I'm going to add a lot more butter and cinnamon to the rolls with white sugar. I think it might make them tastier.

Monday, May 25, 2009

Birthday Board


Supplies for Magnet Board:
1) Magnet Board (make sure it will be big enough to fit all the pieces you'll need for months and family members)
2) Paint (any color, I used black)
3) Finishing Spray (Matte or Glossy, I used Matte)
4) Foam Brush
5) Sand paper
6) Painters tape or masking tape
7) Vinyl lettering (bought already cut) or Vinyl for cutting (can use a Cricut for cutting)

Directions for Board:
1) Tape the metal next to the border so paint doesn't get on it
2) Paint the border of your magnet board, let dry.
3) Paint a 2nd coat on the border, let dry.
4) Sand the edges for antique look (optional)
5) Cover the metal and spray with finishing spray, let dry.
6) Spray a 2nd coat of finishing spray on the border, let dry.
7) Add your vinyl lettering to the top (whatever saying you've chosen)

Supplies for Wooden Shapes:
1) Wooden Shapes for months (I used "signs", about 1 1/2" long)
2) Wooden Shapes for individual birthdays (I used 1 1/2" circles)
3) Paint for Shapes (can do different colors, all one color, whatever your preference, I used a creme color for all shapes)
4) Mod Podge
5) Paint Brush
6) Fine Point Sharpie
7) Pictures of each person (I made all my faces just under 1" and printed them in sepia)
8) Any 1" punch, just make sure your pictures will fit on your wooden shape and have room for writing)
9) Magnets to fit your month wooden shapes
10) Magnets to fit your individual birthday wooden shapes
11) Craft glue for wood

Directions:
1) Paint all wooden shapes with two coats, let dry
2) Punch out each picture with your 1" punch while your paint dries
3) Mod Podge your pictures onto your birthday wooden shapes (no pictures for the months unless you've chosen to do this), let dry completely
4) Write the months on your month wooden shapes with your sharpie
5) Write the name and birthday on each individual wooden shape
6) Glue the magnets onto the back of each wooden shape, let glue cry completely
7) Arrange wooden shapes on your magnet board

Thursday, May 21, 2009

Decorating Papier Mache letters

Here's a quick and easy activity that makes for a quick decorating project or gift.
Supplies needed:
Papier mache or wooden letter
Acrylic paint
Decoupage medium (I use Mod Podge)
2 foam paint brushes
Various decorative paper

Directions:
1. Paint the sides of the letter with your paint. Let dry. Paint a second coat, and let it dry completely.
2. While the paint is drying cut or tear your paper. When the paint is dry lay it out on your letter to arrange it the way you want it.
3. When you have the paper arranged the way you like it use your second foam brush and dip it in the Mod Podge. Brush a medium coat large enough for your paper. It dries pretty quickly so don't try to do the whole thing at once! If your paper is large then apply the MP in small sections. Do this until you have all your paper on there. Let it dry completely.
4. When this is all done then brush MP over the entire thing, including where you painted, to seal it. Let it dry completely.
5. Add coordinating embellishments... ribbon, boas, stickers, etc. My daughter did this and she only wanted ribbon.
You can hang them up, have them sit on shelves or counter tops. Fun, quick, easy and cute!

Monday, May 18, 2009

Floral Hairbows with photos

I see these all over the place, and my daughter wanted me to make her one. I've seen them sold for up to $20. I can make several for that amount.
Supplies:
Hot Glue Gun (and glue)
Large daisies or your preferred flower (I buy a bunch from my local craft store when they're on sale.)
Coordinating ribbon
Metal hair clips or barrettes
Small wire cutter OR a pair of sharp scissors

Directions:
1. Cut a piece of ribbon long enough to cover the clip.
2. Use hot glue to attach to the clip. You need to do this in short sections. I started with gluing the ribbon underneath, secured that, then put more hot glue- to about the middle of the barrette, secured that, the other half, secured that, and then the under side and secured that. If the hot glue does harden up before you get the glue down just heat it up with your hair dryer and reattach. (HINT- This also works if the ribbon or flower gets detached.)
3. Separate the flower layers from each other. Use the wire cutters to cut the flower from the stem. When you pull the center of the flower out there will be a little green nub that everything went into. Cut this so it's even with the bottom. Set aside.
4. Glue the flower in layers, from the bottom up. Push down firmly between each layer to make sure that they are attached well. I glue clear across the barrette for the first layer, and then a dollop of glue in the center for the remaining layers.
This shows how it looks as you glue the layers together. It looks kind of funny until you get them all together.
This is how it will look when you end with the center of the flower.
They're really quite quick and simple to make. I made 21 flower barrettes for my daughter's luau party in under an hour.
If you want to embellish further you can add glitter, sequins, etc. Now I just need to make something so I can store without mushing them up!

Here is how it looks in our hair. You can make them big or small.

Tuesday, May 5, 2009

Cinco de Mayo Recipes

We love Cinco de Mayo. It gives us an excuse to make a great Mexican meal.

The one thing my kids always request is my homemade salsa.
Homemade Salsa
Ingredients:
5-6 firm roma tomatoes, de-seeded
2-3 jalapenos
1/2 - 1 large white onion (can substitute 5-6 green onions)
1 t. salt
1 t. black pepper
1- 14 1/2 oz. can diced tomatoes
1/2 bunch cilantro, washed with stems removed
Wash all produce. Pick leaves off cilantro and place in food processor bowl. Cut up 1/2 - 1 large white onion, diced. Carefully cut and deseed the jalapenos, then dice and add to bowl. Deseed the tomatoes, dice and add to the bowl. Add the salt and pepper, then pour the canned tomatoes on top. Put on food processor and run until everything is well mixed.
Taste and make sure you like the flavor. Add more salt to taste if needed. (If you want it to be hotter add more jalapenos. Or add hotter peppers- habanero or serrano peppers will make it significantly hotter.) Refrigerate for at least 4 hours.
To make guacamole- Add 2 c. of the salsa to 5 mashed avocados mixed with the juice from 2-3 limes. Refrigerate.
For dessert I made Mexican Wedding Cookies. These are quick and easy. They will disappear almost as fast as you can make them!

Mexican Wedding Cookies
(Makes about 48)
1/2 cup powdered sugar
1 cup butter, softened (Do not substitute margarine! It won't set up or taste as good.)
2 teaspoons vanilla
2 cups all-purpose flour
1 cup finely chopped almonds or pecans
1/4 teaspoon salt (omit if your butter is salted)

Bowl of powdered sugar
Pre-heat oven to 325 F. In a large bowl combine the powdered sugar, butter and vanilla. Blend well. Stir in flour, nuts and salt. Shape into 1-inch balls. (I used my small Pampered Chef scooper. It made them perfectly round and the perfect size.) Place on an ungreased cookie sheet. Bake for 15-20 minutes until set but not brown. Immediately remove from cookie sheets. Cool for 2-3 minutes, then roll in powdered sugar. Cool completely and reroll in powdered sugar... if they last that long.
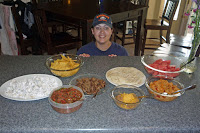
Here's the whole spread for our Cinco de Mayo dinner! Tortilla chips, watermelon, Spanish rice, refried beans with cheese, taco meat, homemade salsa, freshly made tortillas and the Mexican wedding cookies.